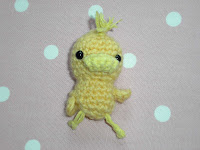
Hi I said I would share the instructions
for the little duck. So here it is.x
This duck is worked in continuous rounds.
They aren't joined at the end of the round.
You just continue on to the next round.
The instructions are also written in UK terms.
(double crochet = single crochet in US terms)
I used 6mm safety eyes. But you could
embroider the eyes if you wanted.
I used a 3.5mm hook and DK yarn.
HEAD AND BODY
To start make a magic ring.
R1. Work 5 double crochet (dc) into the ring
=5 st at end of round.
R2. work 2 dc into each stitch (st).
Repeat all around = 10 st at end of round.
R3. Repeat the following 5 times
work 1 dc into the first st then 2 dc into the next st.
= 15 st at end of round.
R4.Repeat the following 5 times
work 2 dc then 2 dc into the next stitch.
= 20 st at end of round.
R5-R8 Dc 20 in each round.
If using safety eyes I inserted mine below
round 6 with approx 4 st spaces in between
each eye.
Now you will begin to decrease your stitches in
each round to shape the ducks neck.
R9.Repeat the following 5 times
Dc 2 dc 2 together (dc2tog).
= 15 st at end of round.
R10. Repeat the following 5 times
Dc 1 dc2tog. .
=10 st at end of round.
Increasing stitches once again for the body.
R11.Repeat the following 5 times
Work 1 dc into the first st then dc 2 into the next st.
= 15 st at end of round.
You might want to stuff the head now.
R12-R14 . dc 15 in each round.
(Decreasing stitches now)
R15. Repeat the following 5 times.
dc1 dc2tog.
= 10 st at end of round.
Stuff body lightly
R16. Repeat 5 times
dc2tog =5 stitch.
Fasten off leave a long tail to weave end closed.
LEGS
For the legs I used a different shade of yarn.
With a piece of yarn approx 6 inches in length
fold it in half. Double knot one end of the yarn.
Pull the yarn through the bottom of the ducks
body. Then double knot the other end to form
little feet.
WINGS Make 2
Now I hope the following makes sense.
Ch 2 then complete 5dc into 2nd ch from hook
as if to form a round. But don't join to form a circle.
Ch 1 then dc into the same space as the 5th dc.
Dc into middle (the 2nd ch from hook).
Finish off by 1 dc into same space as 1st dc made.
.
It should look a little like a semi circle.
Fasten off leaving long tails to be able to sew wings to
the sides of the ducks body.
HAIR
To make the hair I cut small pieces of yarn.
Attached them to the top of the ducks head by using
the latch hook method.
BEAK
For the Beak I used the same colour yarn as I used for the feet.
Working in rows now.
Ch 5. Dc into 2nd ch from hook. Dc along row = 4 dc
*Turn ch 1 dc into each st along. = 4 dc in each row.*
Repeat ** 2 more times.
Fasten off leave a long tail.
You should now have a little rectangle/square shape.
Fold your piece in half. Then sew the open end closed.

Sew the top edge of your folded square shape to your
ducks face. Placing it between his eyes. Then fold the
shape again and sew along the bottom to form a ducks bill.
That's it finished. I hope that made sense please do
let me know how you get on.xxx


